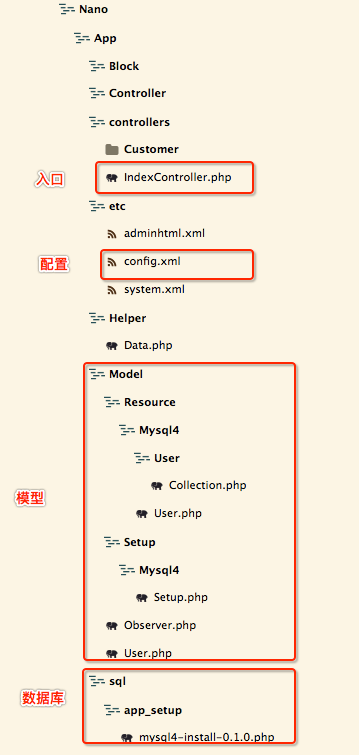
代码框架

配置文件
(1) 修改配置文件后需要清除mageno缓存方可生效
(2) 读、写配置器可以不配置,magento会为没有适配器的资源模型启用默认的适配器,默认的适配器如下面的配置文件所示
magento-practise.local/app/code/local/Nano/App/etc/config.xml1 2 3 4 5 6 7 8 9 10 11 12 13 14 15 16 17 18 19 20 21 22 23 24 25 26 27 28 29 30 31 32 33 34 35 36 37 38 39 40 41 42 43 44 45 46 47 48 49 50 51 52 53 54 55 56 57 58 59 60
| <?xml version="1.0"?> <config> <modules> <Nano_App> <version>0.0.1</version> </Nano_App> </modules> <frontend> <routers> <Nano_App> <use>standard</use> <args> <module>Nano_App</module> <frontName>app</frontName> </args> </Nano_App> </routers> </frontend> <global> <helpers> <nano_app> <class>Nano_App_Helper</class> </nano_app> </helpers> <models> <app> <class>Nano_App_Model</class> <resourceModel>app_mysql4</resourceModel> </app> <app_mysql4> <class>Nano_App_Model_Resource_Mysql4</class> <entities> <user> <table>user_account</table> </user> </entities> </app_mysql4> </models> <resources> <app_setup> <setup> <module>Nano_App</module> <class>Nano_App_Model_Setup_Mysql4_Setup</class> </setup> <connection> <use>core_setup</use> </connection> </app_setup> <app_write> <!-读配置器-> <connection> <use>default_write</use> </connection> </app_write> <app_read> connection> <use>default_read</use> </connection> </app_read> </resources> </global>
|
数据库图形化界面
调试的时候如果不想在终端执行sql语句,可以使用数据库软件
在mac环境可以用Sequel Pro
windows环境可以用Navicat
创建mysql数据库 - 安装脚本
为了便于理解magento中的mysql,我们这里直接用magento自带的方法安装数据库,不手动建立数据库了
如代码结构图所示,在sql目录下创app_setup目录,并新建mysql4_install-0.0.1.php
注意,安装程序的版本号需要和config.xml里的版本号保持一致
编辑如下:
magento-practise.local/app/code/local/Nano/App/sql/app_setup/mysql4-install-0.1.0.php1 2 3 4 5 6 7 8 9 10 11 12 13 14
| <?php $installer = $this; $installer->startSetup(); $installer->run(" -- DROP TABLE IF EXISTS {$this->getTable('app/user')}; CREATE TABLE `{$this->getTable('app/user')}` ( `id` int(11) unsigned NOT NULL AUTO_INCREMENT, `user_name` varchar(32) DEFAULT NULL, `pass_word` varchar(32) DEFAULT NULL, `schoolName` varchar(32) DEFAULT NULL, PRIMARY KEY (`id`) ) ENGINE=InnoDB AUTO_INCREMENT=1 DEFAULT CHARSET=utf8; "); $installer->endSetup();
|
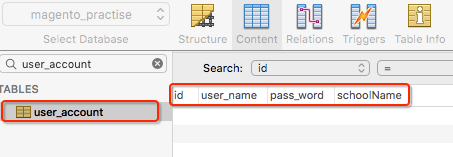
这时候,访问你的magento主页,当加载到APP模块的时候就会执行安装脚本,并创建一张名为user_account的表,表中有四个字段,自增的id,用户名user_name,密码pass_word,学校名称schoolName(这里用驼峰型后面要用)

注1:从app/user到表user_account的过程如下:左边的app是模型名,右边的user是实体名,先寻找名为app的模型,再找它的默认资源模型:app_mysql4,资源模型下寻找名为user的实体,即为user_account
注2:如果安装程序没有生效,查看core_resource表,找到名为app_setup的一项,删除该项,并清空magento的缓存,即可

创建模型
magento-practise.local/app/code/local/Nano/App/Model/User.php1 2 3 4 5 6 7 8
| <?php class Nano_App_Model_User extends Mage_Core_Model_Abstract { public function _construct() { $this->_init('app/user'); } }
|
创建资源模型
模型类会自动调用资源模型类,资源模型类是与数据库进行对话的组件
magento-practise.local/app/code/local/Nano/App/Model/Resource/Mysql4/User.php1 2 3 4 5 6 7 8
| <?php class Nano_App_Model_Resource_Mysql4_User extends Mage_Core_Model_Mysql4_Abstract { public function _construct() { $this->_init('app/user','id'); } }
|
创建模型集合
通过模型集合,可以同时操作多条记录
magento-practise.local/app/code/local/Nano/App/Model/Resource/Mysql4/User/Collection.php1 2 3 4 5 6 7 8
| <?php class Nano_App_Model_Resource_Mysql4_User_Collection extends Mage_Core_Model_Mysql4_Collection_Abstract { public function _construct() { $this->_init('app/user'); } }
|
使用数据库
使用get, set, unset, has方法来进行进行数据的读取、写入、删除、判断是否存在
插入数据
magento-practise.local/app/code/local/Nano/App/controllers/IndexController.php1 2 3 4 5 6 7 8 9 10 11
| public function insertAction() { $user = Mage::getModel("app/user"); $user->setUserName('mengmeng'); $user->setPassWord('123'); $user->setData('schoolName','seu'); $user->save(); echo 'saved!'; }
|
(1) 对于名称为下划线格式的字段,setUserName('a')等价于setData('user_name','a')
(2) setUserName这样的方法之所以能生效,是因为使用了__set()魔术方法
调用insert接口:

查看数据库:

查询数据
magento-practise.local/app/code/local/Nano/App/controllers/IndexController.php1 2 3 4 5 6 7 8
| public function selectAction() { $user = Mage::getModel("app/user"); $user->load(1); echo $user->getUserName().'<br/>'; echo $user->getData('schoolName').'<hr/>'; echo 'selected!'; }
|
调用select接口:

getUserName这样的方法之所以能生效,是因为使用了__get()魔术方法
修改数据
magento-practise.local/app/code/local/Nano/App/controllers/IndexController.php1 2 3 4 5 6 7 8
| public function updateAction() { $user = Mage::getModel("app/user"); $user->load(1); $user->setUserName('xiamengmeng'); $user->save(); echo 'updated!'; }
|
调用update接口:

查看数据库:

删除数据
magento-practise.local/app/code/local/Nano/App/controllers/IndexController.php1 2 3 4 5 6 7
| public function delete() { $user = Mage::getModel("app/user"); $user->load(1); $user->delete(); echo 'deleted!'; }
|
调用delete接口

查看数据库:

获取所有数据
magento-practise.local/app/code/local/Nano/App/controllers/IndexController.php1 2 3 4 5 6 7 8
| public function collectAction() { $users = Mage::getModel("app/user")->getCollection(); foreach($users as $user){ echo $user->getId().':'.$user->getUserName()."<br/>"; } echo '<hr/>'.'get all data!'; }
|
先向数据库中插入几条数据

再调用collect接口

这里用到了前面创建的模型集合类
修改数据库 - 更新脚本
想要对已经创建的数据库进行修改,如增加字段,改变字段属性等,最简单粗暴的方式是直接修改安装脚本,然后在core_resource脚本中删除模块对应的setup,如app_setup,模块就会重新执行安装脚本
这种方法只适合本地调试用
线上有需要修改数据库的,应当使用更新脚本
我们之前创建的表user_account,我们要增加一个字段age
首先修改config.xml的版本号
magento-practise.local/app/code/local/Nano/App/etc/config.xml1 2 3 4 5 6 7
| <?xml version="1.0"?> <config> <modules> <Nano_App> <version>0.0.2</version> </Nano_App> </modules>
|
然后在App模块的sql文件夹下新建mysql4-upgrade-0.0.1-0.0.2.php,文件名表示你要从0.0.1版本升级到0.0.2版本
magento-practise.local/app/code/local/Nano/App/sql/app_setup/mysql4-upgrade-0.0.1-0.0.2.php1 2 3 4 5 6 7
| <?php $installer = $this; $installer->startSetup(); $installer->run(" ALTER TABLE `{$this->getTable('app/user')}` ADD `age` INT(4) NOT NULL; "); $installer->endSetup();
|
清除缓存后,访问你本地的magento网站
这时,查看数据库,发现age字段已经出现了

再查看core_resource表

app模块的版本号也已经成功升级到了0.2.0
FAQ
core_resource表中能找到模块的setup字段,但是数据库的表没有新建成功?
查看数据库安装脚本的版本号与config.xml头部的版本号是否一致


